Friday, July 12, 2013

Gourmet Peanut Butter and Jelly Sandwich

Rustic sourdough bread with Sweet n Salty Peanut Butter and Carrot Cake Jam


You know, for when you want something a little different in your all natural peanut butter.

Thursday, July 11, 2013

Easy Entertaining - Spicy Mexican Peanut Butter Bites

Photo: Ooh...Spicy Mexican Peanut Butter mini tacos.  I blended kidney beans with pb and then topped it with cheese; sour cream; lettuce; and tomato

It's no secret that I love natural peanut butter.  Check out these yummy mini taco salads I made with Spicy Mexican Peanut Butter.  I tossed pb and kidney beans and heated them in the microwave (or stovetop) until warm and then I sprinkled on some cheese, sour cream, lettuce and tomato for a healthy, gluten free snack.

Healthy Snacking for Kids

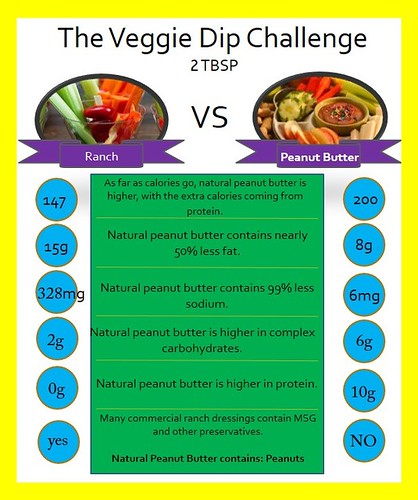
So I decided to put together a little sheet on the difference between serving veggies with ranch dressing or with peanut butter.  Below are the results of the nutritional comparison.  As you can see, peanut butter is lower in fat, sodium, and higher in protein.  I also love that you can out out a mixed tray with fruit and veggies when you are serving peanut butter.  Ranch is only good on veggies.  My personal favorite natural peanut butter for dipping is Rosemary Garlic, but the kids seem to love Chocolate Butterscotch.  
peanut butter v ranch
The other thing I love about The Granola Tree Peanut Butter is that you know that it is GLUTEN FREE.  With ranch, some are, some aren't.

Wednesday, July 10, 2013

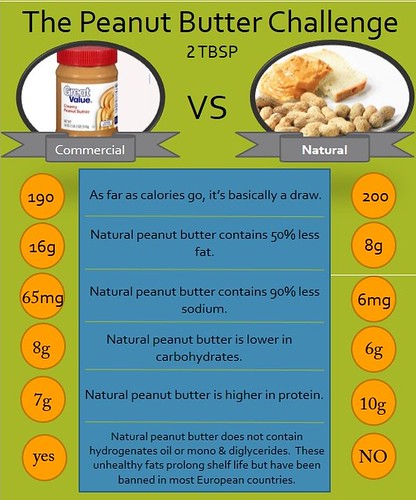
The truth about peanut butter - comerical versus natural

natural versus commercial peanut butter

Ever wonder why you should make the switch to eating natural peanut butter?  Well give yourself a pat on the back because there are so many reasons.  Natural peanut butter is lower in fat, carbohydrates, sodium, and it's higher in protein.  Plus, natural peanut butter contains no trans-fats.

Tuesday, July 9, 2013

21 Great Peanut Butter Snacks for Kids

Looking for some fun and easy summer snacks for the kids (or yourself).  Check out this roundup of 21 simple summer snacks with peanut butter.
Peanut Butter, Banana and Chia Seed Bagelwich Recipe

http://www.shape.com/healthy-eating/healthy-recipes/10-healthy-peanut-butter-recipes


http://domesticcharm.blogspot.com/2011/08/kids-peanut-butter-banana-sushi.html

apple peanut butter snack
http://www.onefunmom.com/2011/06/apple-peanut-butter-snacks/apple-peanut-butter-snack/


http://www.parentsconnect.com/parenting-your-kids/kids-eating/kid-healthy-snack/?page=2


http://livelearnloveeat.com/tag/vegan-snacks-for-kids/


http://www.ourfamilyworld.com/2011/06/20/kids-in-the-kitchen-and-healthy-summer-snacks/


http://raddestmom.com/tag/peanut-butter/


http://blog.weangreen.com/fun-snacks-for-kids/


http://evolvingmotherhood.com/2011/06/kid-friendly-snack-bugs-on-a-log.html


http://easteuropeanfood.about.com/od/fruits/r/Healthful-Kids-Peanut-Butter-And-Fruit-Breakfast-Recipe.htm


http://www.babble.com/best-recipes/crispy-chewy-peanut-butter-granola-bites/


http://www.tumblr.com/tagged/healthy%20snacks%20for%20kids


http://realmomkitchen.com/8237/fab-five-after-school-snacks/


http://snacksandstories.blogspot.com/


http://stephanies-simply-delicious-food.blogspot.com/2012/06/apple-sandwiches-with-granola-and.html


http://greenkidcraftsblog.com/2013/01/10/snack-idea-for-kids/\\


http://a-fat-girl-ate-me.blogspot.com/2012/01/easy-after-school-snack-pretzel-pops.html


http://www.deniseinbloom.com/banana-snacks-with-sprinkles/


http://www.tipjunkie.com/food/party-food/peanut-butter-cheese-ball/


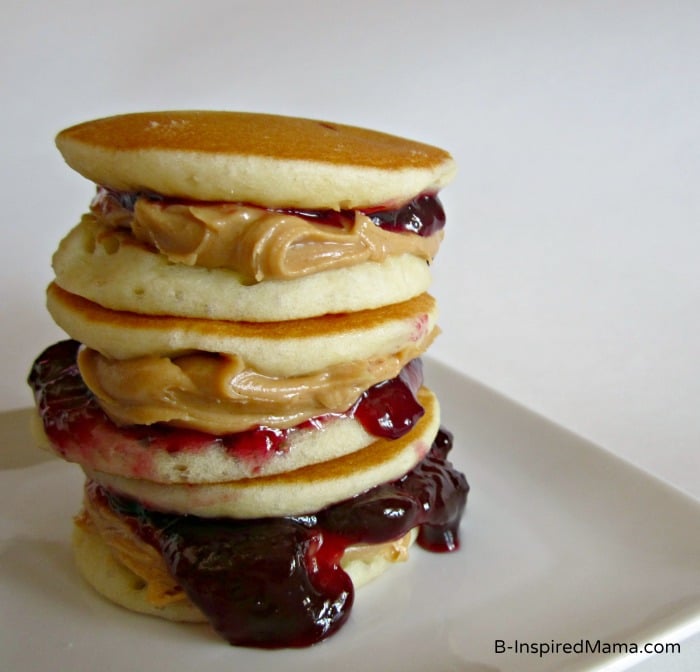
http://b-inspiredmama.com/2013/04/peanut-butter-jelly-pancake-bites-eggowaffleoff/

\
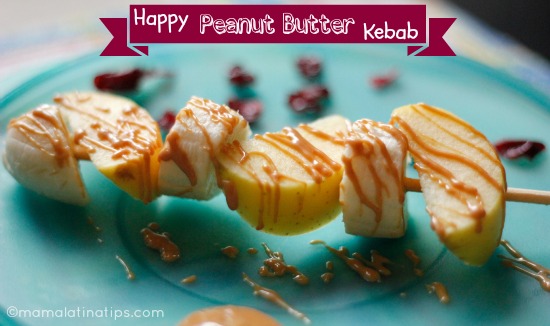
http://www.mamalatinatips.com/2013/05/happy-peanut-butter-kebab.html

Wednesday, April 4, 2012

Marshmallow Chicks

Marshmallow Chicks are a delicious homemade version of Marshmallow Peeps! Peeps are an Easter classic, but sometimes their enjoyment is more nostalgic than taste-based. These homemade Marshmallow Chicks retain the charming shape of the original, but these soft, fresh vanilla-scented marshmallows taste much better.
Marshmallow Chicks photo

  • 3 cups sugar, divided use
  • Yellow food coloring
  • 9 tablespoons water, divided use
  • 2.5 teaspoons (1 envelope) unflavored gelatin
  • 1 tsp vanilla extract, or any other flavoring you'd like
  • 1 tablespoon cocoa powder or chocolate chips
  • Piping bag with 1/2-inch round tip
  • Candy thermometer
  • Mixer with whisk attachment

Preparation:

1. Place 2 cups of the granulated sugar in a large, gallon-size Ziploc bag. Add a few drops of yellow food coloring to the sugar. Massage the coloring and sugar together with your hands through the plastic bag, adding more color if necessary to achieve the desired hue. It will take a few minutes to fully distribute the color, so be patient and thorough. Sift the sugar once it is the color you want so that any remaining clumps of color can be removed.
2. Prepare a baking sheet by lining it with aluminum foil. Generously spread a layer of colored sugar on the foil.
3. Place the gelatin and 5 tablespoons of the water in a small bowl and stir. Allow the gelatin to sit for several minutes.
4. Combine the remaining 1 cup of plain granulated sugar and 4 tablespoons of water in a small saucepan. Insert a candy thermometer, bring to a boil over medium heat and cook to soft-ball stage (235 degrees Fahrenheit).
5. Once it reaches the correct temperature, remove the pan from the heat and add in the gelatin mixture. Stir with a whisk or a spatula until it is thoroughly combined and no gelatin lumps remain.
6. Pour the hot gelatin syrup in the bowl of an electric mixer. Allow it to cool until it is barely warm to the touch.
7. Once the gelatin is just warm, begin to beat it with a whisk attachment. Start on medium speed, and once the mixture is no longer clear but has turned white and opaque, add the vanilla and turn the mixer to high speed.
8. Beat for 10 minutes, until the candy is stiff, glossy and white. Add in a few drops of liquid yellow food coloring and beat until well-distributed.
9. Immediately place the candy in a pastry bag fitted with a 1/2 –inch round tip (or a coupler base without a tip). Pipe the Chicks onto the baking sheet covered with colored sugar. To pipe the Chicks, begin with the body: hold the bag an inch above the surface at a 90 degree angle. Squeeze the marshmallow out, allowing it to form a 1-inch round before beginning to pull back towards you. Taper as you move backward, forming a 3-inch body. Release pressure and pull the bag upward to form the “tail.”
10. Next, form the Chick head by again placing the bag at a 90 degree angle. Pipe on top of your body segment, and move the bag back toward the tail. Once you have reached the middle of the body, reverse directions and move the bag back toward the front of the chick's body. Simultaneously release pressure on the bag so that the marshmallow stops flowing and tapers off into a "beak" shape.  Depending on the size of your chicks, you should get about 18-20 marshmallow chicks from this recipe.
11. While the marshmallow is still wet, sprinkle the chicks all over with the remaining colored sugar.
12.Mix the cocoa powder with a few drops of water to form a thick paste, or melt the chocolate chips in the microwave. Use a small paintbrush or a toothpick to dot the chocolate on the chicks to form eyes.

Peanut Butter Easter Eggs

Peanut Butter Easter Eggs Recipe

Ingredients

  • 1 (16 ounce) package confectioners' sugar
  • 1 cup creamy peanut butter
  • 1/4 cup butter
  • 1 tablespoon milk
  • 8 (1 ounce) squares semi-sweet chocolate
  • 1 tablespoon shortening

Directions

  1. In a mixing bowl, combine confectioners' sugar, peanut butter, butter and milk (if needed for moisture) until blended. Shape mixture into two 1/2 pound eggs or make a bunch of smaller eggs. Freeze eggs for 1 hour.
  2. While the eggs are freezing, cut semi-sweet chocolate into small pieces and place in top of double boiler with shortening. Melt over medium heat, stirring frequently until smooth. Stick a long-tined fork in top of each peanut butter egg, dip it in melted chocolate to cover then drain on waxed paper. When the eggs are cooled and set, decorate the eggs to suit your fancy.